[Cilium Study 1기 by Gasida] Hubble Observability 요약
Hubble
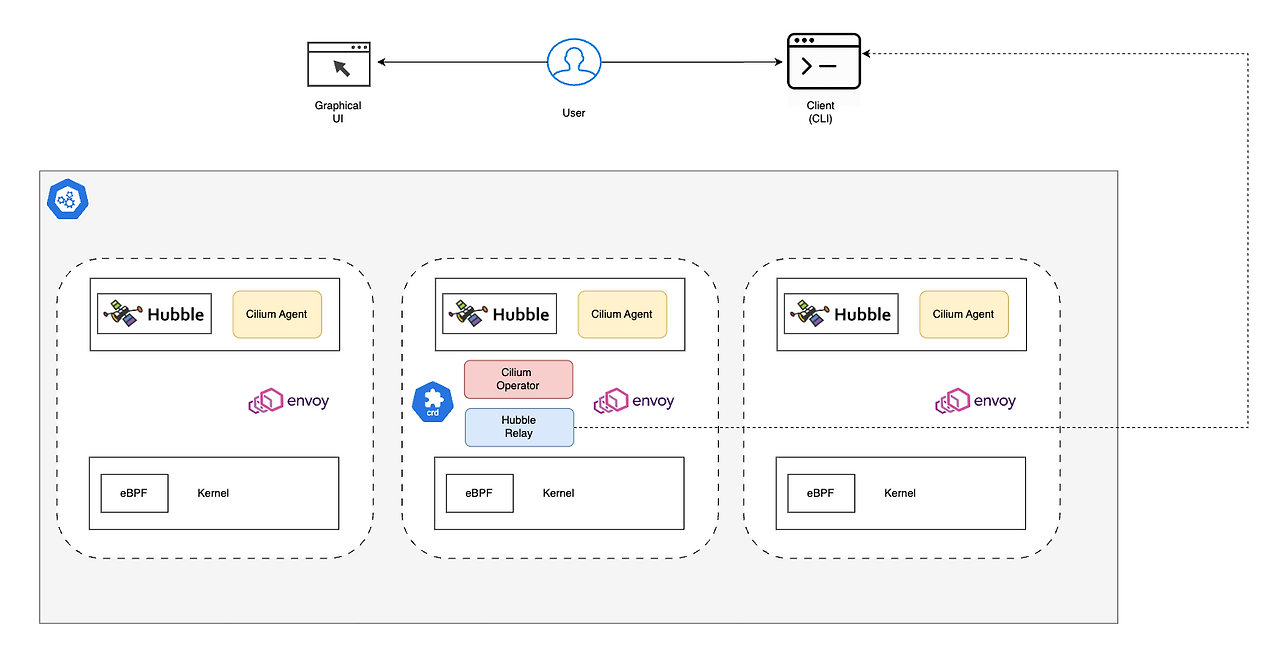
Cilium이 eBPF를 활용하여 커널 수준에서 네트워크 트래픽을 처리하고, Hubble이 이 트래픽에 대한 심층적인 관측 가능성 데이터를 수집하며, Hubble Relay가 이 데이터를 중앙 집계하여 사용자에게 클러스터 전체의 가시성을 제공하는 과정
허블은 Cilium과 eBPF를 기반으로 한 분산형 네트워크 및 보안 관측 플랫폼이다. 서비스 간 통신과 동작, 네트워크 인프라에 대한 깊은 가시성을 낮은 오버헤드로 제공한다.
Hubble의 주요 기능
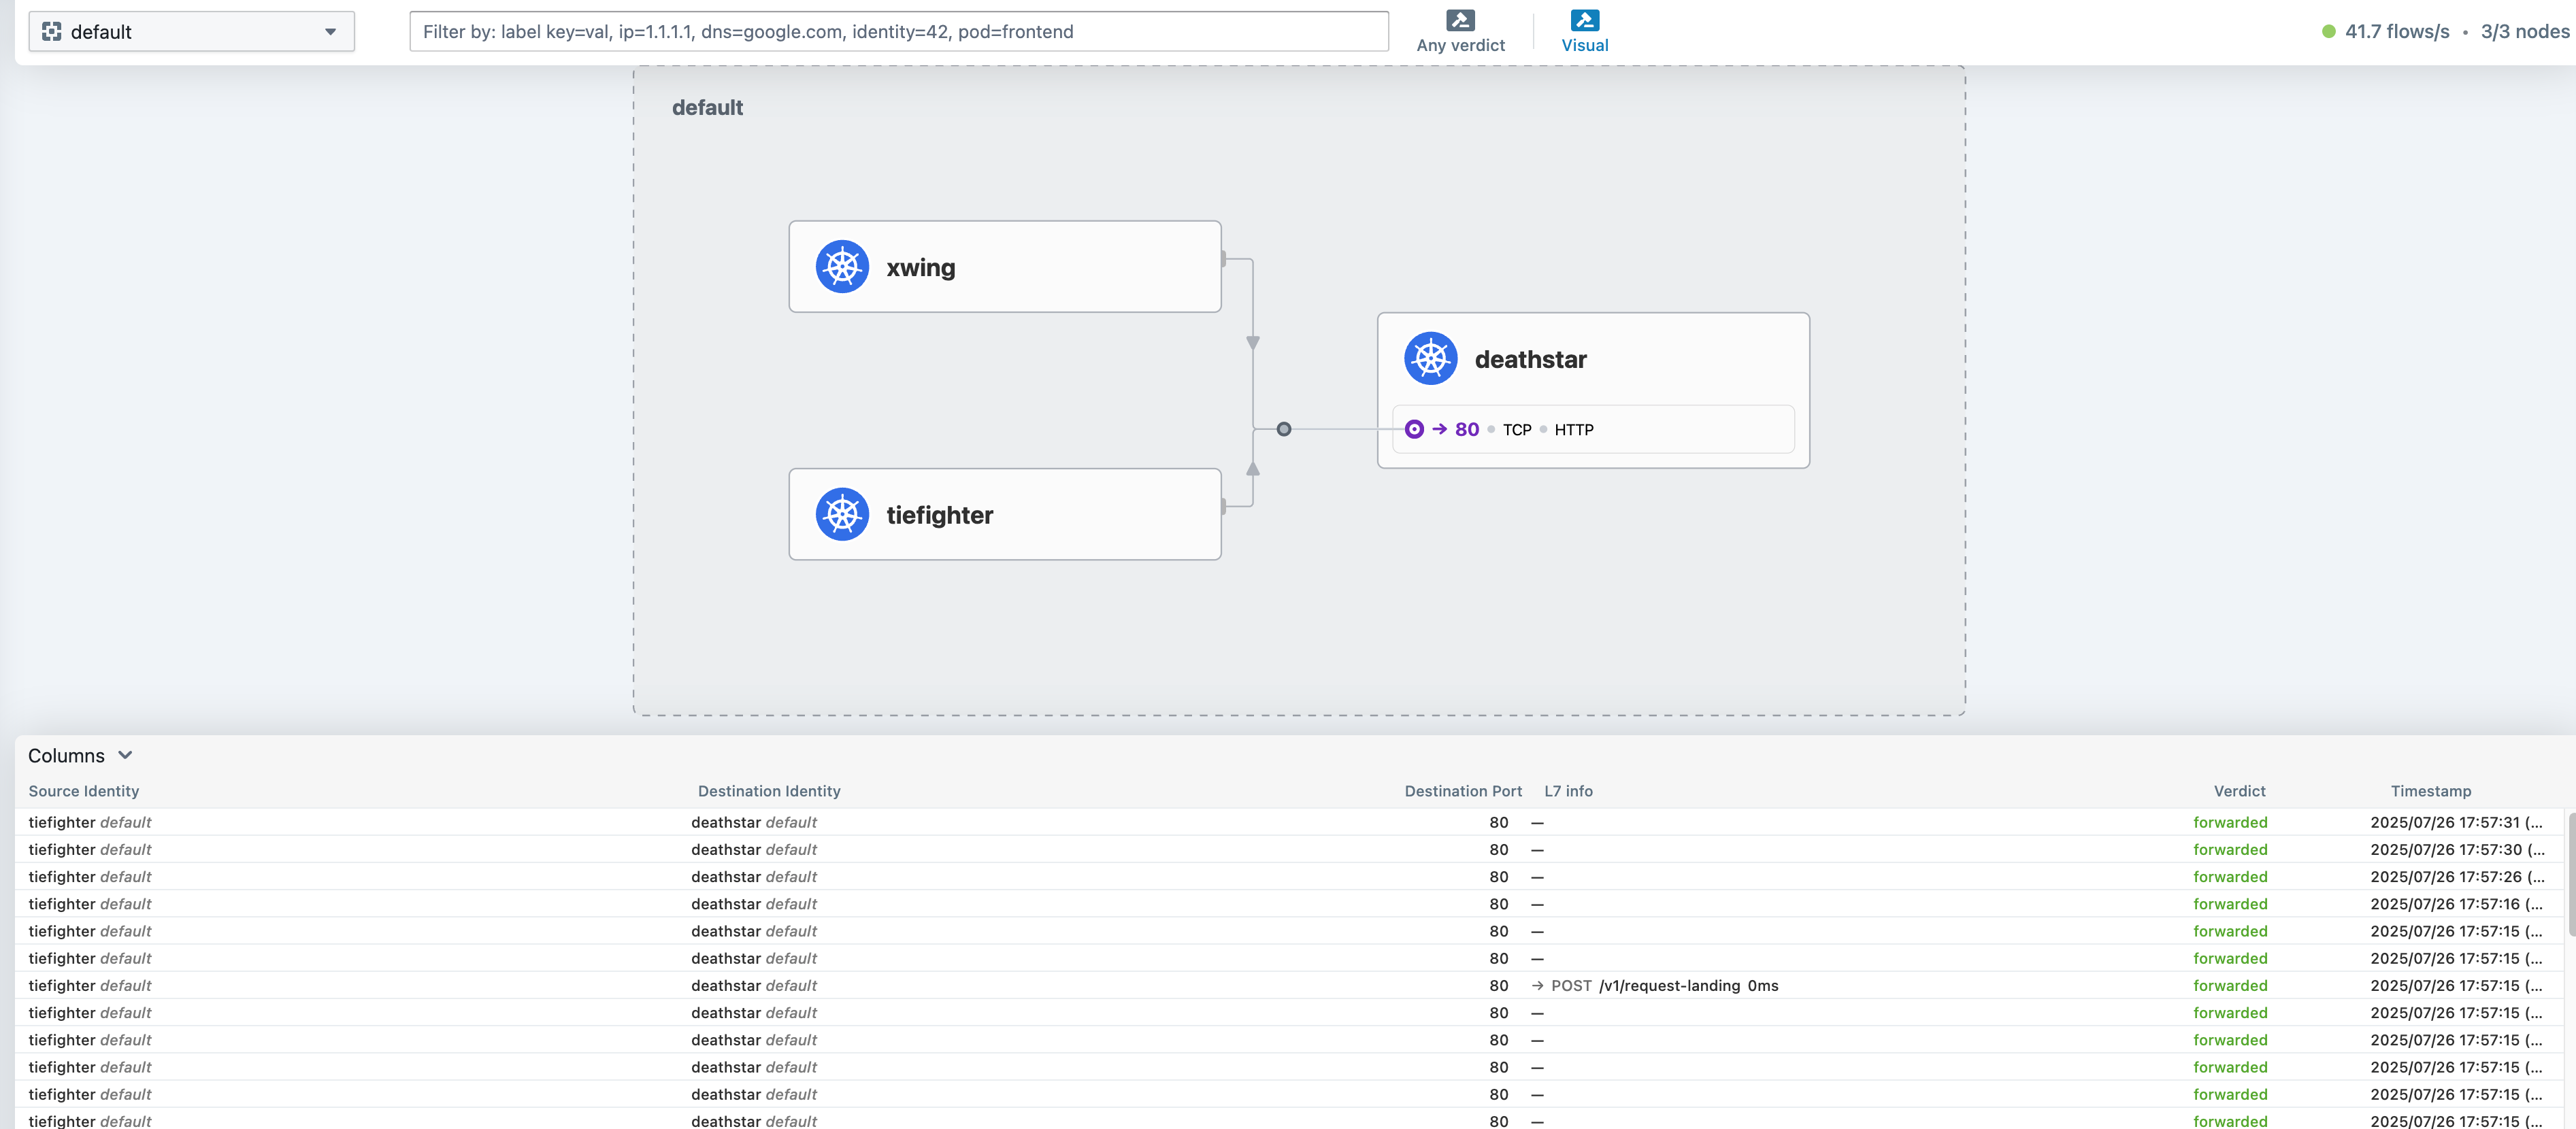
서비스 종속성 및 통신 맵: 서비스 간 통신 관계, 빈도, HTTP 호출, Kafka 토픽 등을 시각화
네트워크 모니터링 및 경고: 통신 실패 원인(DNS, 애플리케이션/네트워크 문제), TCP 연결 문제 등을 식별
애플리케이션 모니터링: HTTP 응답 코드 비율, 요청/응답 지연 시간 등을 모니터링
보안 관측 가능성: 네트워크 정책에 의해 차단된 연결, 클러스터 외부 접근, 특정 DNS 이름 확인 서비스 등을 추적
주요 구성요소 및 작동방식
Hubble(노드 수준) : 기본적으로 각 노드에 설치된Cilium Agent는 해당 노드의 트래픽만 관찰한다.Hubble Relay(클러스터 수준) : 클러스터 전체 또는 여러 클러스터의 데이터를 집계하여 중앙에서 가시성을 제공하는 구성요소이다.hubble-relay는hubble-peer서비스를 통해 모든 노드의4244포트에 접근한다Hubble UI: Hubble Relay에 연결하여 데이터를 시각화 하는 웹 인터페이스이다. L3/L4부터 L7 수준의 서비스 의존성 맵과 데이터 흐름을 자동으로 검색하고 필터링한다.Hubble Client(CLI): hubble status, hubble observe 등의 명령어로 Hubble API에 접근하여 흐름 정보를 조회
Hubble Client 설치 (리눅스 기준)
1
2
3
4
5
6
7
HUBBLE_VERSION=$(curl -s https://raw.githubusercontent.com/cilium/hubble/master/stable.txt)
HUBBLE_ARCH=amd64
if [ "$(uname -m)" = "aarch64" ]; then HUBBLE_ARCH=arm64; fi
curl -L --fail --remote-name-all https://github.com/cilium/hubble/releases/download/$HUBBLE_VERSION/hubble-linux-${HUBBLE_ARCH}.tar.gz{,.sha256sum}
sudo tar xzvfC hubble-linux-${HUBBLE_ARCH}.tar.gz /usr/local/bin
which hubble
hubble status
Hubble API Access 검증
Hubble API에 접근하기 위해서는 로컬 머신에서 Hubble service를 포트포워딩 해야한다.
이는 Hubble Client의 4245 포트로 접속하는 것과 클러스터 내의 Hubble Relay service에 접근하는 것을 허용해준다.
1
2
3
4
5
6
7
8
9
10
11
12
13
14
15
16
17
18
19
20
21
22
23
24
25
26
cilium hubble port-forward&
ss -tnlp | grep 4245
# Now you can validate that you can access the Hubble API via the installed CLI
hubble status
Healthcheck (via localhost:4245): Ok
Current/Max Flows: 12,285/12,285 (100.00%)
Flows/s: 41.20
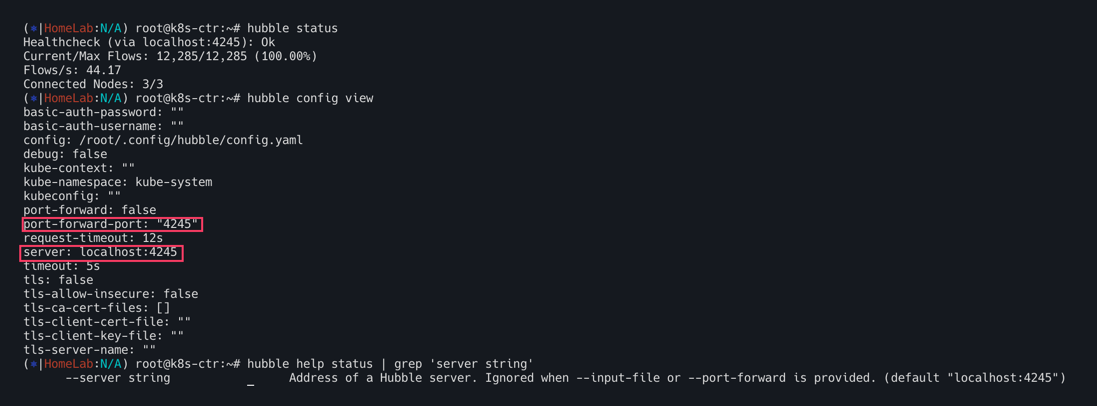
# hubble (api) server 기본 접속 주소 확인
hubble config view
...
port-forward-port: "4245"
server: localhost:4245
...
# (옵션) 현재 k8s-ctr 가상머신이 아닌, 자신의 PC에 kubeconfig 설정 후 아래 --server 옵션을 통해 hubble api server 사용해보자!
hubble help status | grep 'server string'
--server string Address of a Hubble server. Ignored when --input-file or --port-forward is provided. (default "localhost:4245")
# You can also query the flow API and look for flows
kubectl get ciliumendpoints.cilium.io -n kube-system # SECURITY IDENTITY
hubble observe
hubble observe -h
hubble observe -f
Hubble/UI 데모
배포
아래와 같이 데모 어플리케이션을 배포하자.
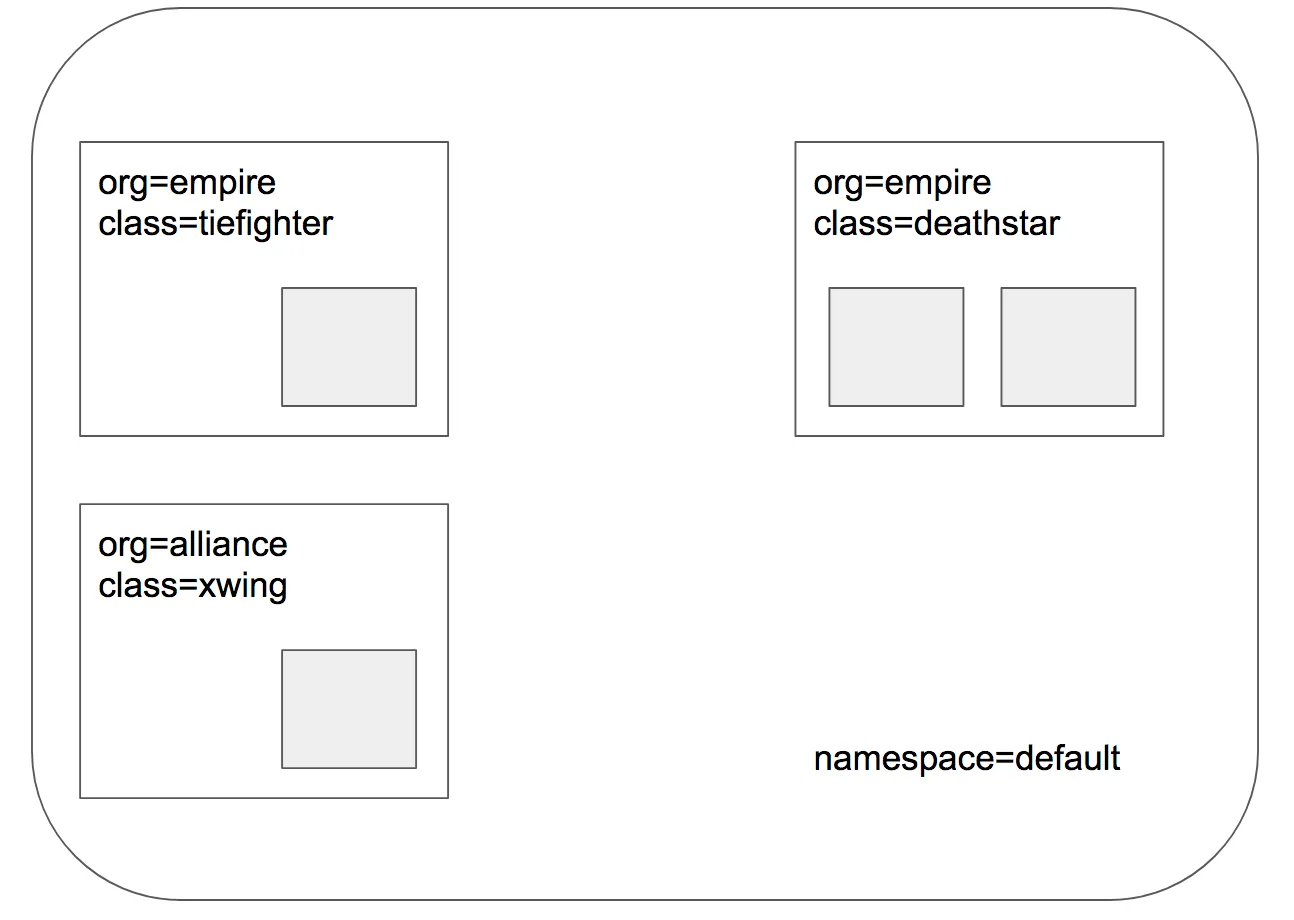
deathstar(Web Service 80 port, 2 Pod),tiefighter,xwing애플리케이션
1
2
3
4
5
6
7
8
kubectl apply -f https://raw.githubusercontent.com/cilium/cilium/1.17.6/examples/minikube/http-sw-app.yaml
kubectl get pod --show-labels
kubectl get deploy,svc,ep deathstar
kubectl get ciliumidentities.cilium.io
kubectl exec -it -n kube-system ds/cilium -c cilium-agent -- cilium endpoint list
kubectl exec -it $CILIUMPOD0 -n kube-system -c cilium-agent -- cilium endpoint list
kubectl exec -it $CILIUMPOD1 -n kube-system -c cilium-agent -- cilium endpoint list
kubectl exec -it $CILIUMPOD2 -n kube-system -c cilium-agent -- cilium endpoint list
현재 접근상태 확인
시나리오 상 deathstar파드에서의 관점은 org=empire라는 label이 부착된 파드만 연결을 허락할 수 있다.
하지만 아직 정책을 수행하지 않으므로 Xwing, tiefighter 모두 요청 가능
이제 이를 테스트해보자.
1
2
3
4
5
6
# 아래 출력에서 xwing 와 tiefighter 의 IDENTITY 메모
c1 endpoint list | grep -iE 'xwing|tiefighter|deathstar'
c2 endpoint list | grep -iE 'xwing|tiefighter|deathstar'
XWINGID=7526
TIEFIGHTERID=56716
DEATHSTARID=2454

1
2
3
4
5
6
7
8
9
10
11
12
13
14
15
16
17
18
19
20
21
22
23
24
25
26
27
28
29
30
31
32
33
# 모니터링 준비 : 터미널 3개, 단축키 설정
## 각각 monitor 확인
c0 monitor -v -v
c1 monitor -v -v
c2 monitor -v -v

# 모니터링 준비 : 터미널 1개
hubble observe -f

XWINGID=50633
TIEFIGHTERID=19274
DEATHSTARID=318

hubble observe -f --from-identity $XWINGID
hubble observe -f --protocol udp --from-identity $XWINGID
hubble observe -f --protocol tcp --from-identity $XWINGID

hubble observe -f --protocol tcp --from-identity $DEATHSTARID


# 호출 시도 1
kubectl exec xwing -- curl -s -XPOST deathstar.default.svc.cluster.local/v1/request-landing
while true; do kubectl exec xwing -- curl -s -XPOST deathstar.default.svc.cluster.local/v1/request-landing ; sleep 5 ; done


# 호출 시도 2
kubectl exec tiefighter -- curl -s -XPOST deathstar.default.svc.cluster.local/v1/request-landing
while true; do kubectl exec tiefighter -- curl -s -XPOST deathstar.default.svc.cluster.local/v1/request-landing ; sleep 5 ; done

## 모니터링
hubble observe -f --protocol tcp --from-identity $TIEFIGHTERID
hubble observe -f --protocol tcp --from-identity $DEATHSTARID
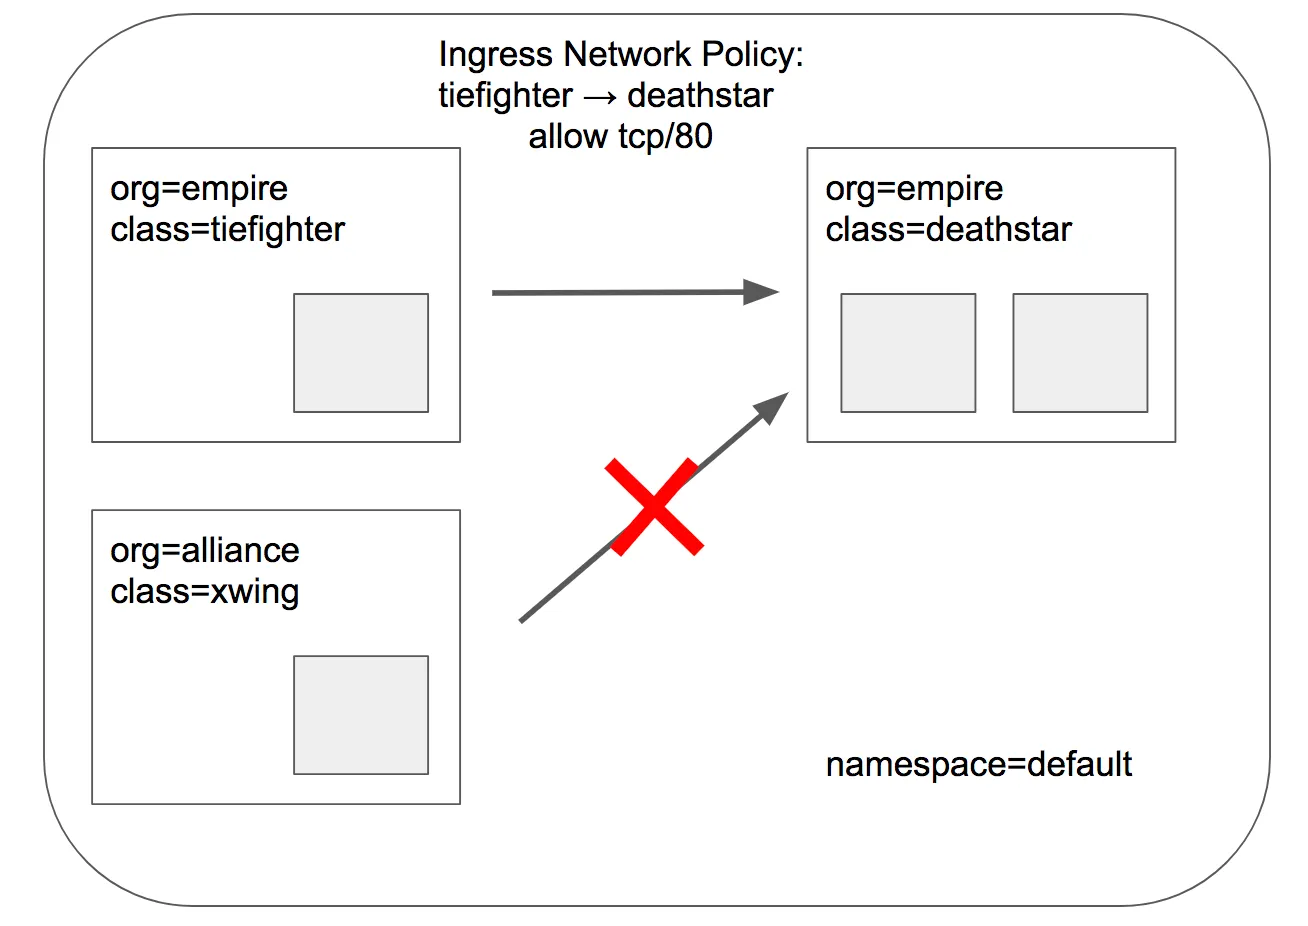
- Cilium을 사용할때 파드에 할당된 레이블을 사용하여 보안정책 강화 (클러스터 내에서 실행중이거나 실행중인 위치 관계없음)
- 따라서
deathstart로 들어오는 착륙요청 (Ingress 요청)은org=empire로만 제한하는 기본정책을 적용할 것임. 그렇다면 위 사진처럼xwing서비스는 레이블이org=aliance로 정의되어 있으므로 접속 불가 (TCP/IP 정책 - L3/L4 네트워크 보안정책)
아래 CiliumNetworkPolicy은 TCP 포트 80에서 레이블org=empire이 있는 모든 팟에서 레이블org=empire, class=deathstar이 있는 deathstar으로 전송되는 트래픽을 화이트리스트로 작성
1
2
3
4
5
6
7
8
9
10
11
12
13
14
15
16
17
18
apiVersion: "cilium.io/v2"
kind: CiliumNetworkPolicy
metadata:
  name: "rule1"
spec:
  description: "L3-L4 policy to restrict deathstar access to empire ships only"
  endpointSelector:
    matchLabels:
      org: empire
      class: deathstar
  ingress:
  - fromEndpoints:
    - matchLabels:
        org: empire
    toPorts:
    - ports:
      - port: "80"
        protocol: TCP
정책 검사
1
2
3
4
# deathstar 에 ingress 에 policy 활성화 확인
c0 endpoint list
c1 endpoint list
c2 endpoint list
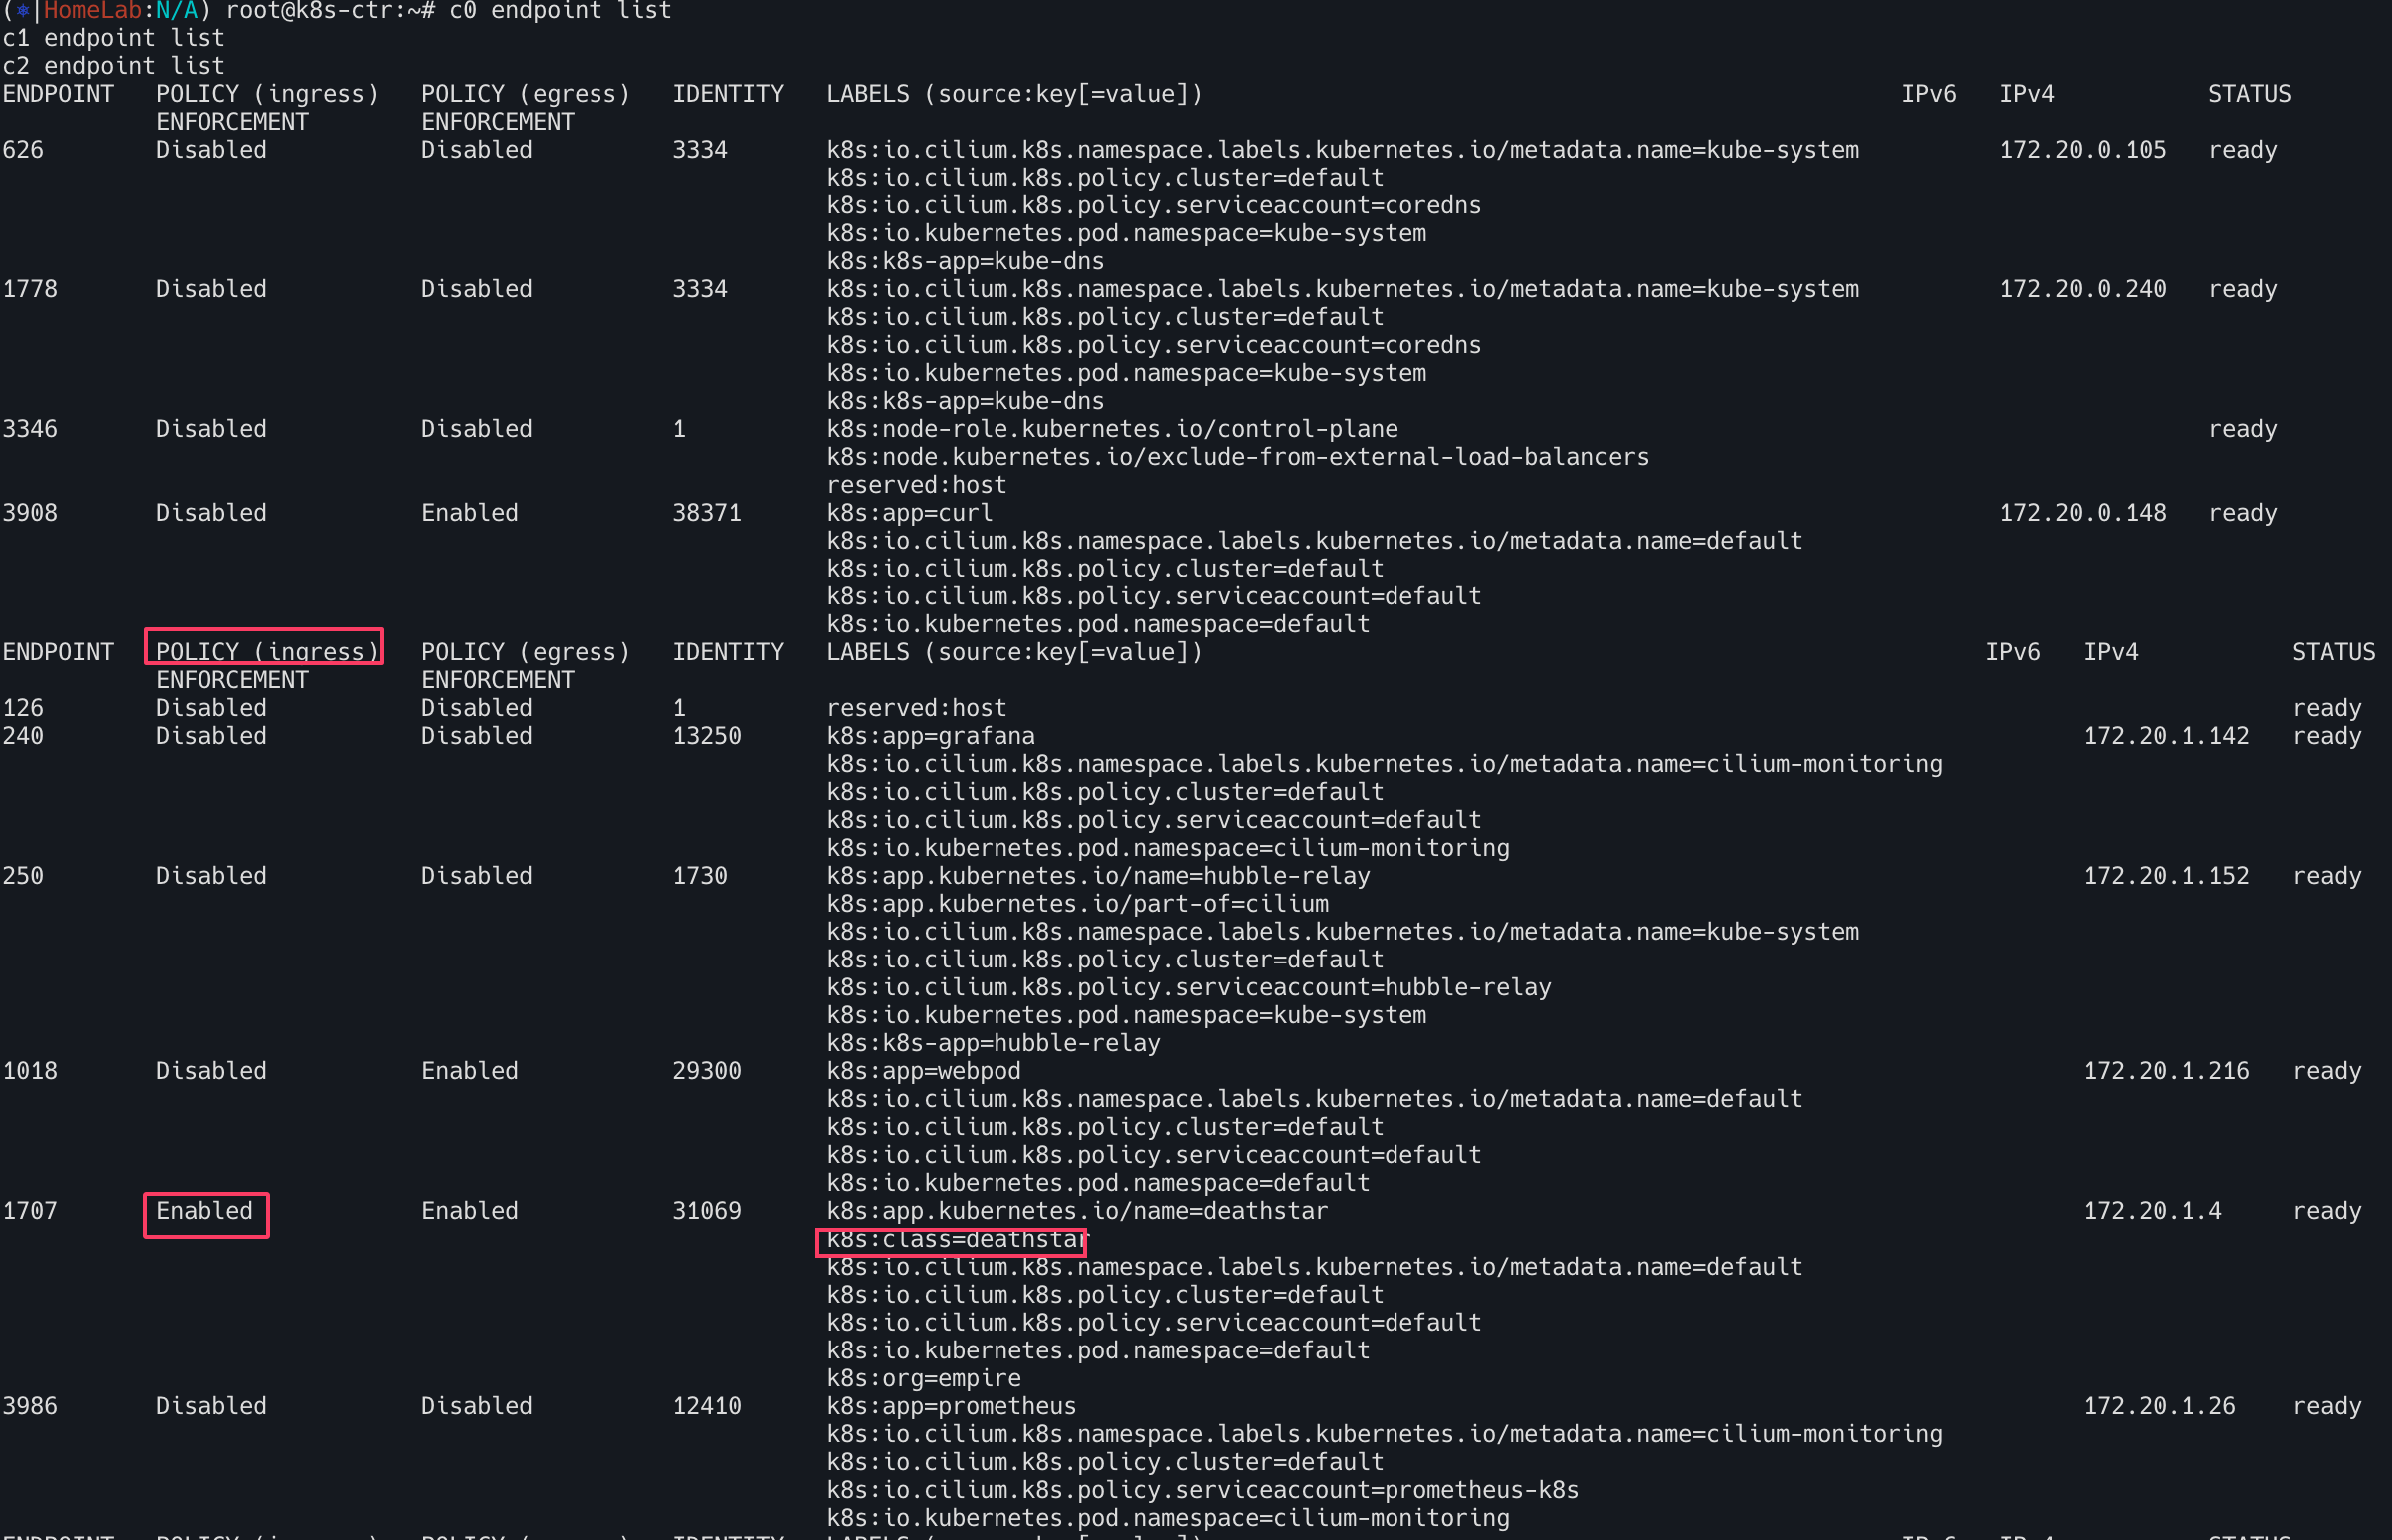
POLICY(ingress)가 Enabled 가 되어있는것을 확인할 수 있다.
패킷라이프
L7 동작처리는 cilium-envoy가 담당한다. kc describe ds -n kube-system cilium-envoy로 확인해보자. 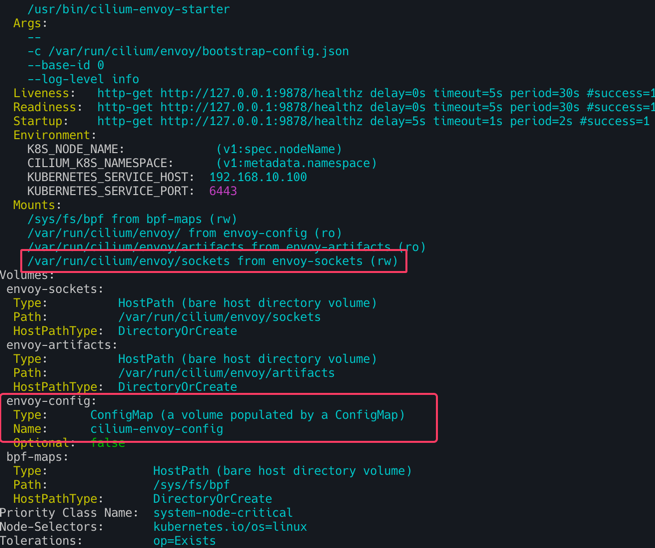
테스트 HTTP
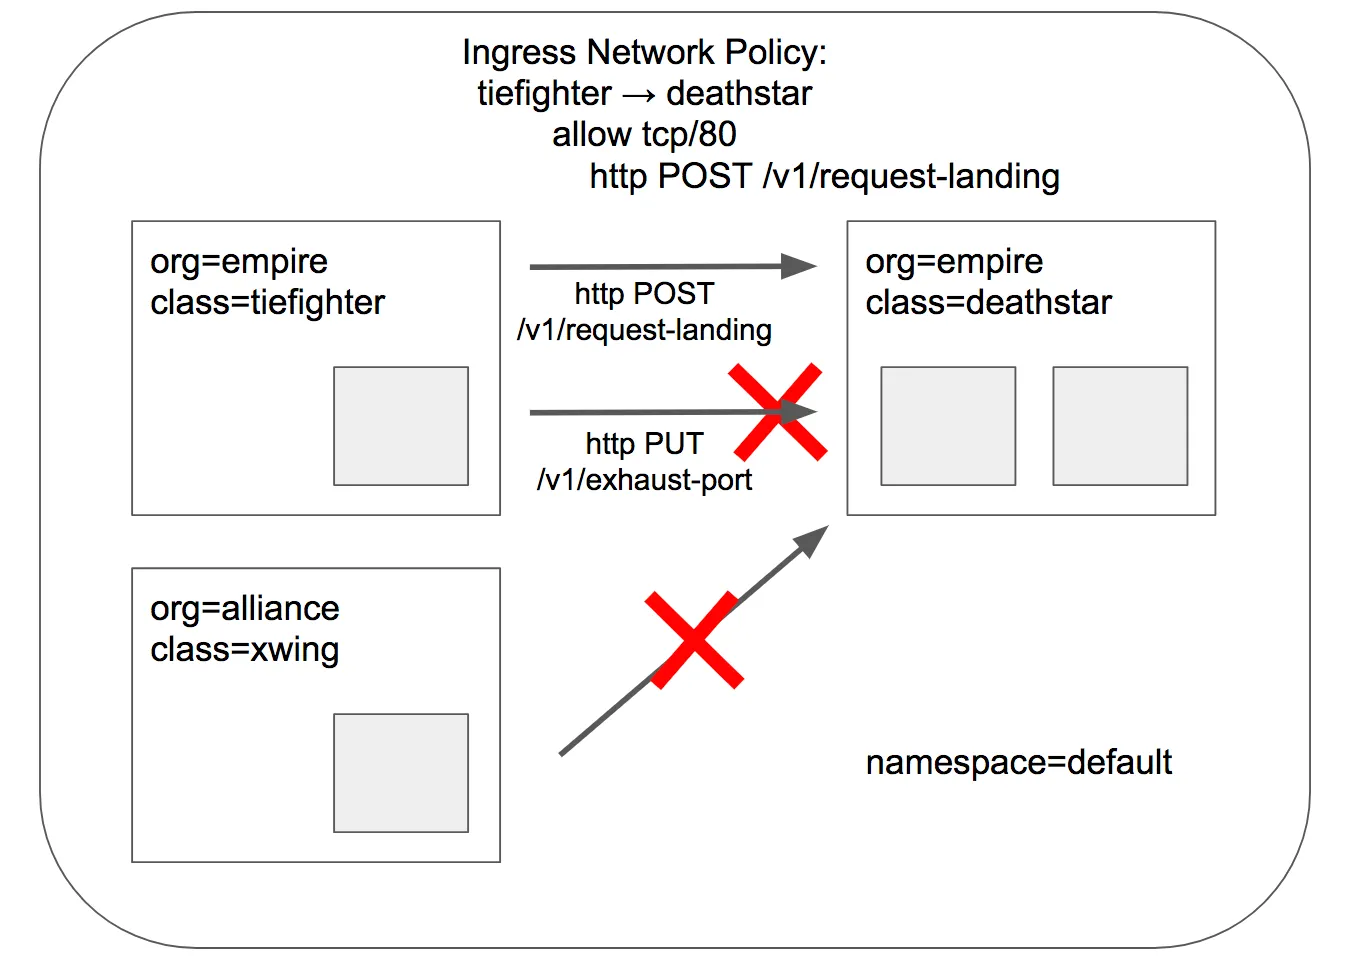
tiefighter, xwing에게 deathstar API에 대한 전체 액세스 권한을 부여하거나 완전 액세스 권한을 부여하지 않는 것으로 충분 할 수도 있지만 마이크로서비스 간에 가장 강력한 보안(최소 권한 격리 강제)을 제공하기 위해서는 API를 호출하는 각 서비스가 합법적인 운영에 필요한 HTTP 요청 세트만 수행하도록 제한해야함
deathstar service가 임의의 제국 선박이 호출해서는 안 되는 일부 유지보수 API를 노출한다고 가정
1
2
# 모니터링 >> Layer3/4 에서는 애플리케이션 상태를 확인 할 수 없음!
hubble observe -f --protocol tcp --from-identity $DEATHSTARID
1
2
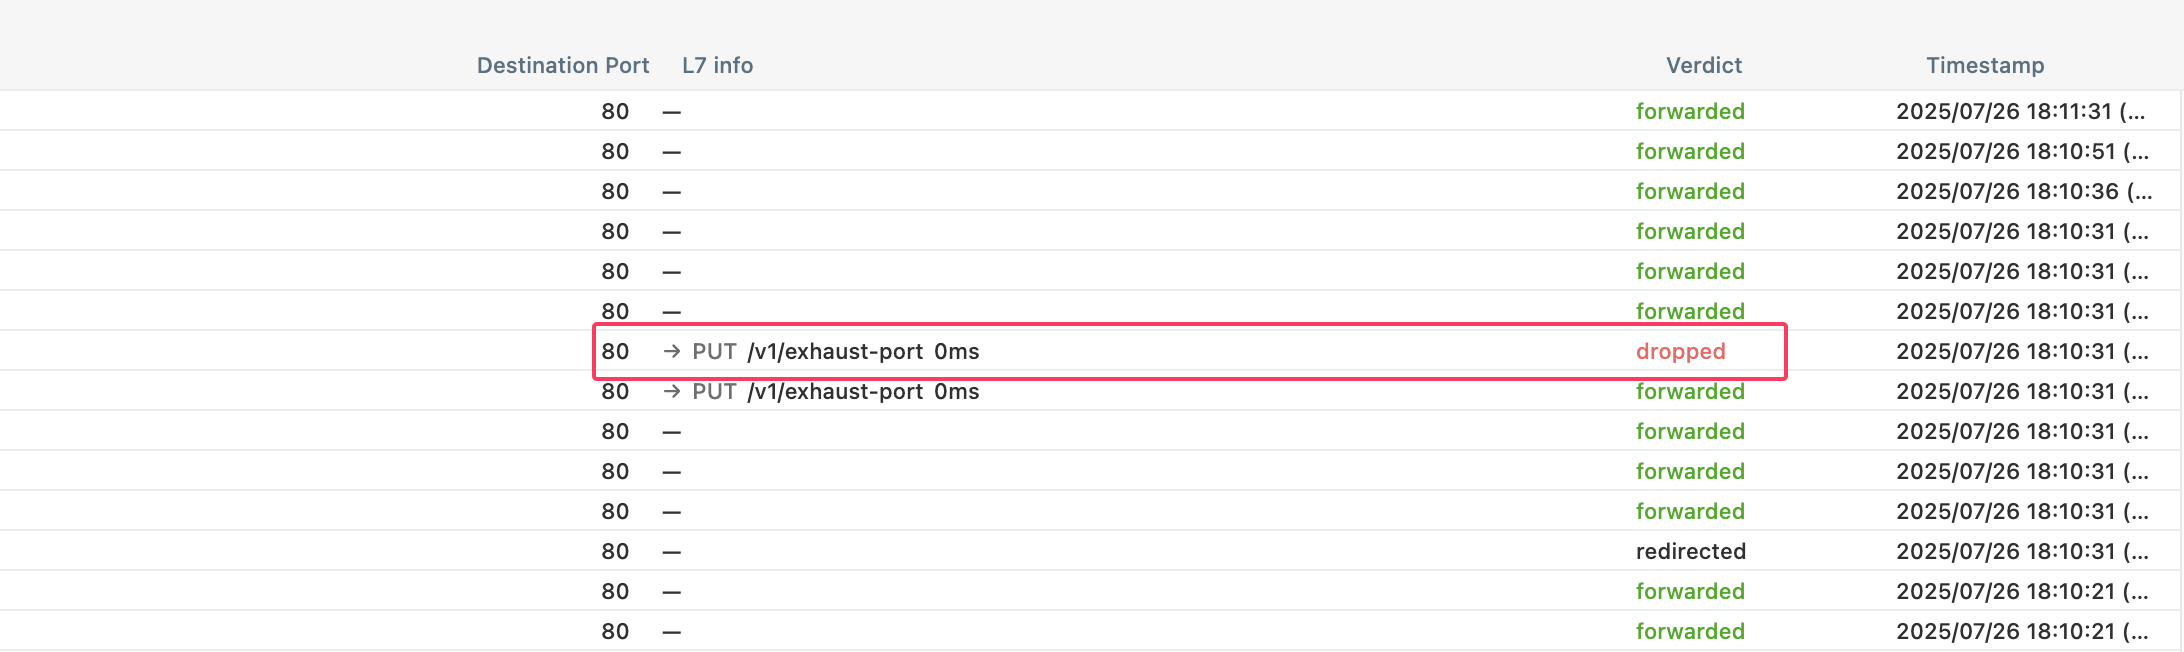
# 호출해서는 안 되는 일부 유지보수 API를 노출
kubectl exec tiefighter -- curl -s -XPUT deathstar.default.svc.cluster.local/v1/exhaust-port
기존 CiliumNetworkPolicy 업데이트
1
2
3
4
5
6
7
8
9
10
11
12
13
14
15
16
17
18
19
20
21
22
23
# 기존 rule1 정책을 업데이트 해서 사용
apiVersion: "cilium.io/v2"
kind: CiliumNetworkPolicy
metadata:
  name: "rule1"
spec:
  description: "L7 policy to restrict access to specific HTTP call"
  endpointSelector:
    matchLabels:
      org: empire
      class: deathstar
  ingress:
  - fromEndpoints:
    - matchLabels:
        org: empire
    toPorts:
    - ports:
      - port: "80"
        protocol: TCP
      rules:
        http:
        - method: "POST"
          path: "/v1/request-landing"
/v1/request-landing API는 성공, /v1/exhaust-port API는 Access denied가 출력되는 것을 알 수 있다.

Layer 7 Protocol Visibility
Monitoring Datapath State는 datapath state에 대한 성찰을 제공하지만, 기본적으로 L3/L4 패킷 이벤트에 대한 가시성만 제공한다. 따라서 L7 프로토콜 가시성을 원한다면 L7 Cilium Network Policies 을 사용해야한다. 실제 L7동작처리는 cilium-envoy 데몬셋이 담당한다. (L7 네트워크 정책은 가시성을 가능하게 할 뿐만 아니라 파드의 인아웃 트래픽을 제한한다는 점이 중요!)
L7 네트워크 정책 (가시성) 생성 및 확인
L7정책 가시성을 확인하기 위해 또 다른 터미널에서 반복접속을 시행해 두자.
1
kubectl exec -it curl-pod -- sh -c 'while true; do curl -s webpod | grep Hostname; sleep 1; done'
CiliumNetworkPolicy 리소스 확인한다. 아래와 같이 rules: http:[{}]를 통해 모든 HTTP요청을 허용 및 L7에대한 가시성을 활성화한다.
1
2
3
4
5
6
7
8
9
10
11
12
13
14
15
16
17
18
19
20
21
22
23
24
25
26
27
28
29
cat <<EOF | kubectl apply -f -
apiVersion: "cilium.io/v2"
kind: CiliumNetworkPolicy
metadata:
  name: "l7-visibility"
spec:
  endpointSelector:
    matchLabels:
      "k8s:io.kubernetes.pod.namespace": default  # default 네임스페이스 안의 모든 Pod에 대해 egress 정책이 적용
  egress:
  - toPorts:
    - ports:
      - port: "53"
        protocol: ANY  # TCP, UDP 둘 다 허용
      rules:
        dns:
        - matchPattern: "*"  # 모든 도메인 조회 허용, L7 가시성 활성화
  - toEndpoints:
    - matchLabels:
        "k8s:io.kubernetes.pod.namespace": default
    toPorts:
    - ports:
      - port: "80"  # default 다른 파드의 HTTP TCP 80 요청 허용
        protocol: TCP
      - port: "8080"  # default 다른 파드의 HTTP TCP 8080 요청 허용
        protocol: TCP
      rules:
        http: [{}]  # 모든 HTTP 요청을 허용, L7 가시성 활성화
EOF
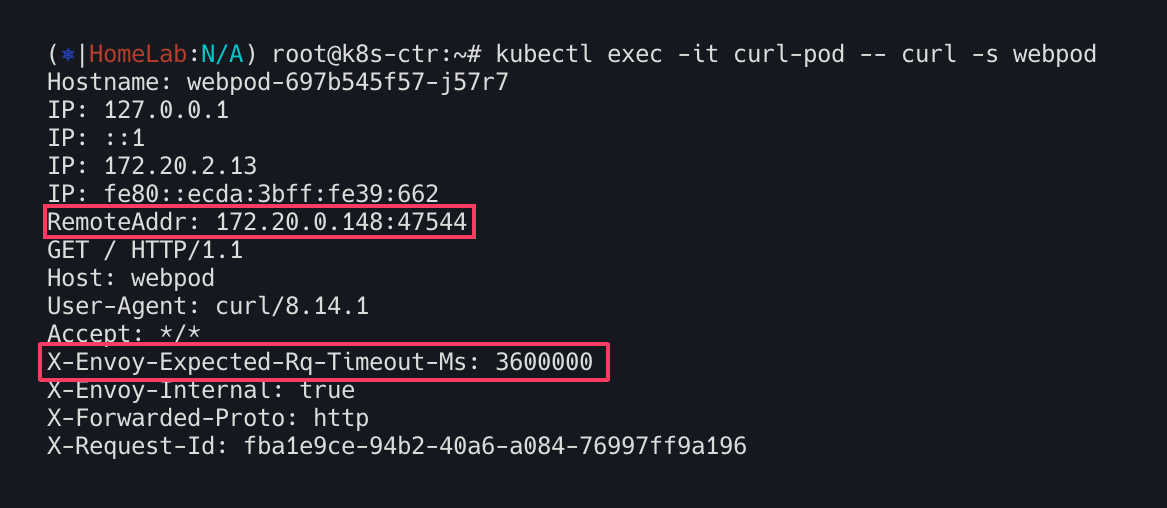
정책 적용 후 호출 확인(실제 L7 정책처리는 envoy가 한다.)
1
kubectl exec -it curl-pod -- curl -s webpod
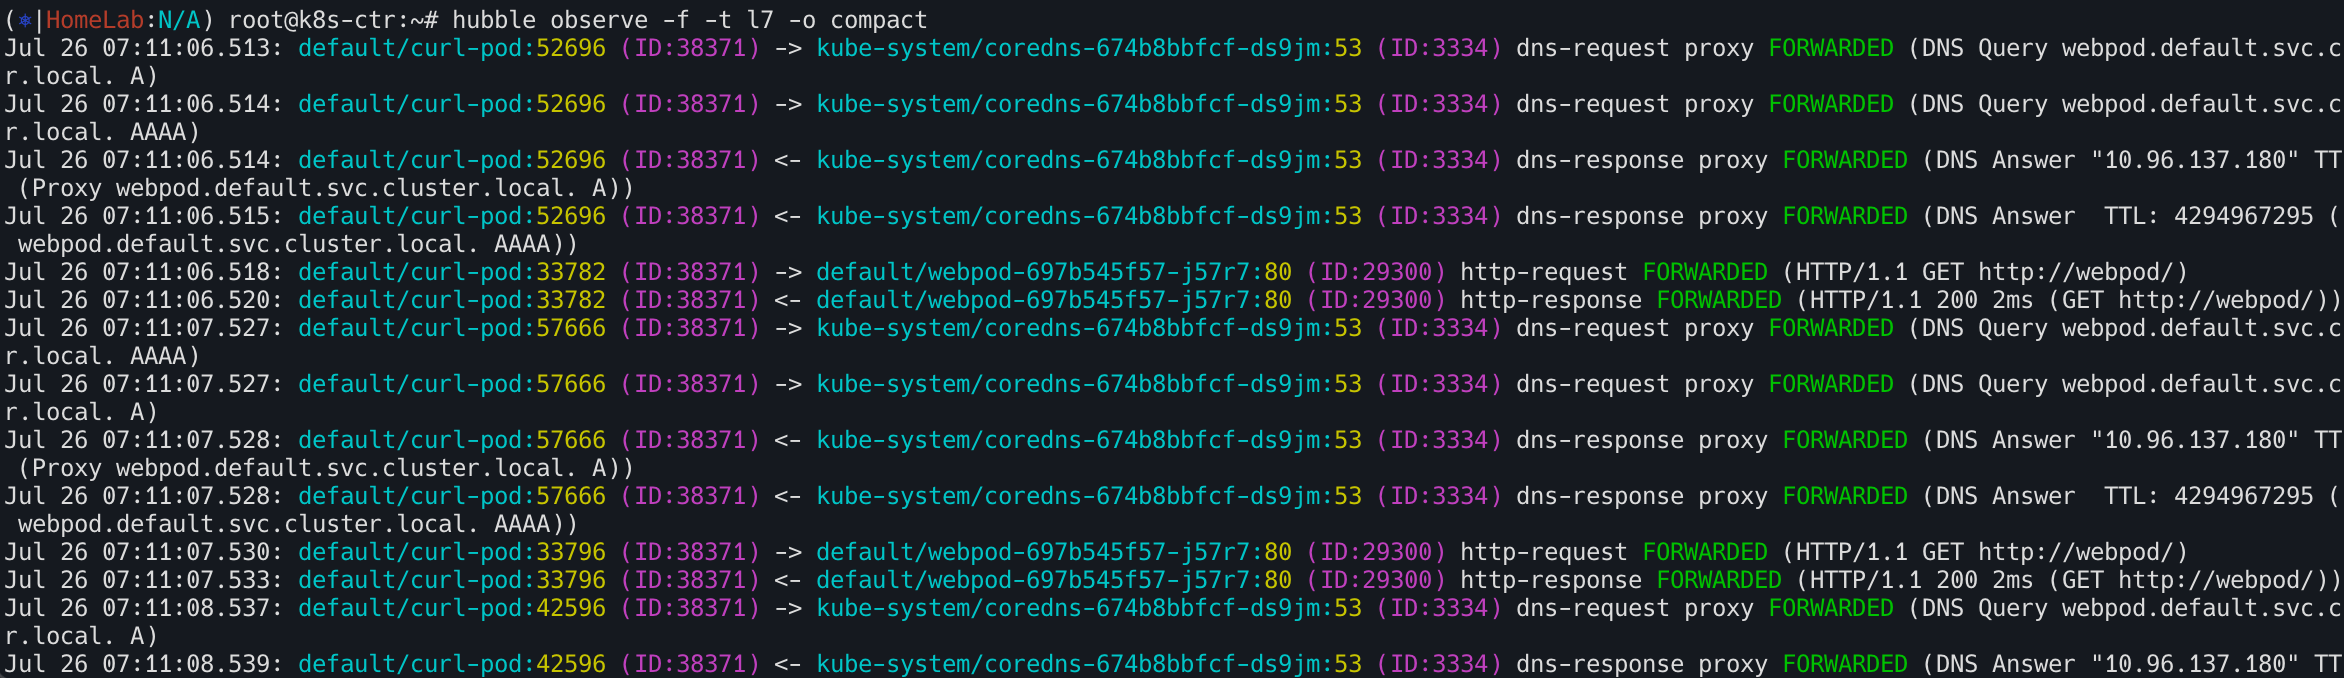
가시성 확인
1
hubble observe -f -t l7 -o compact
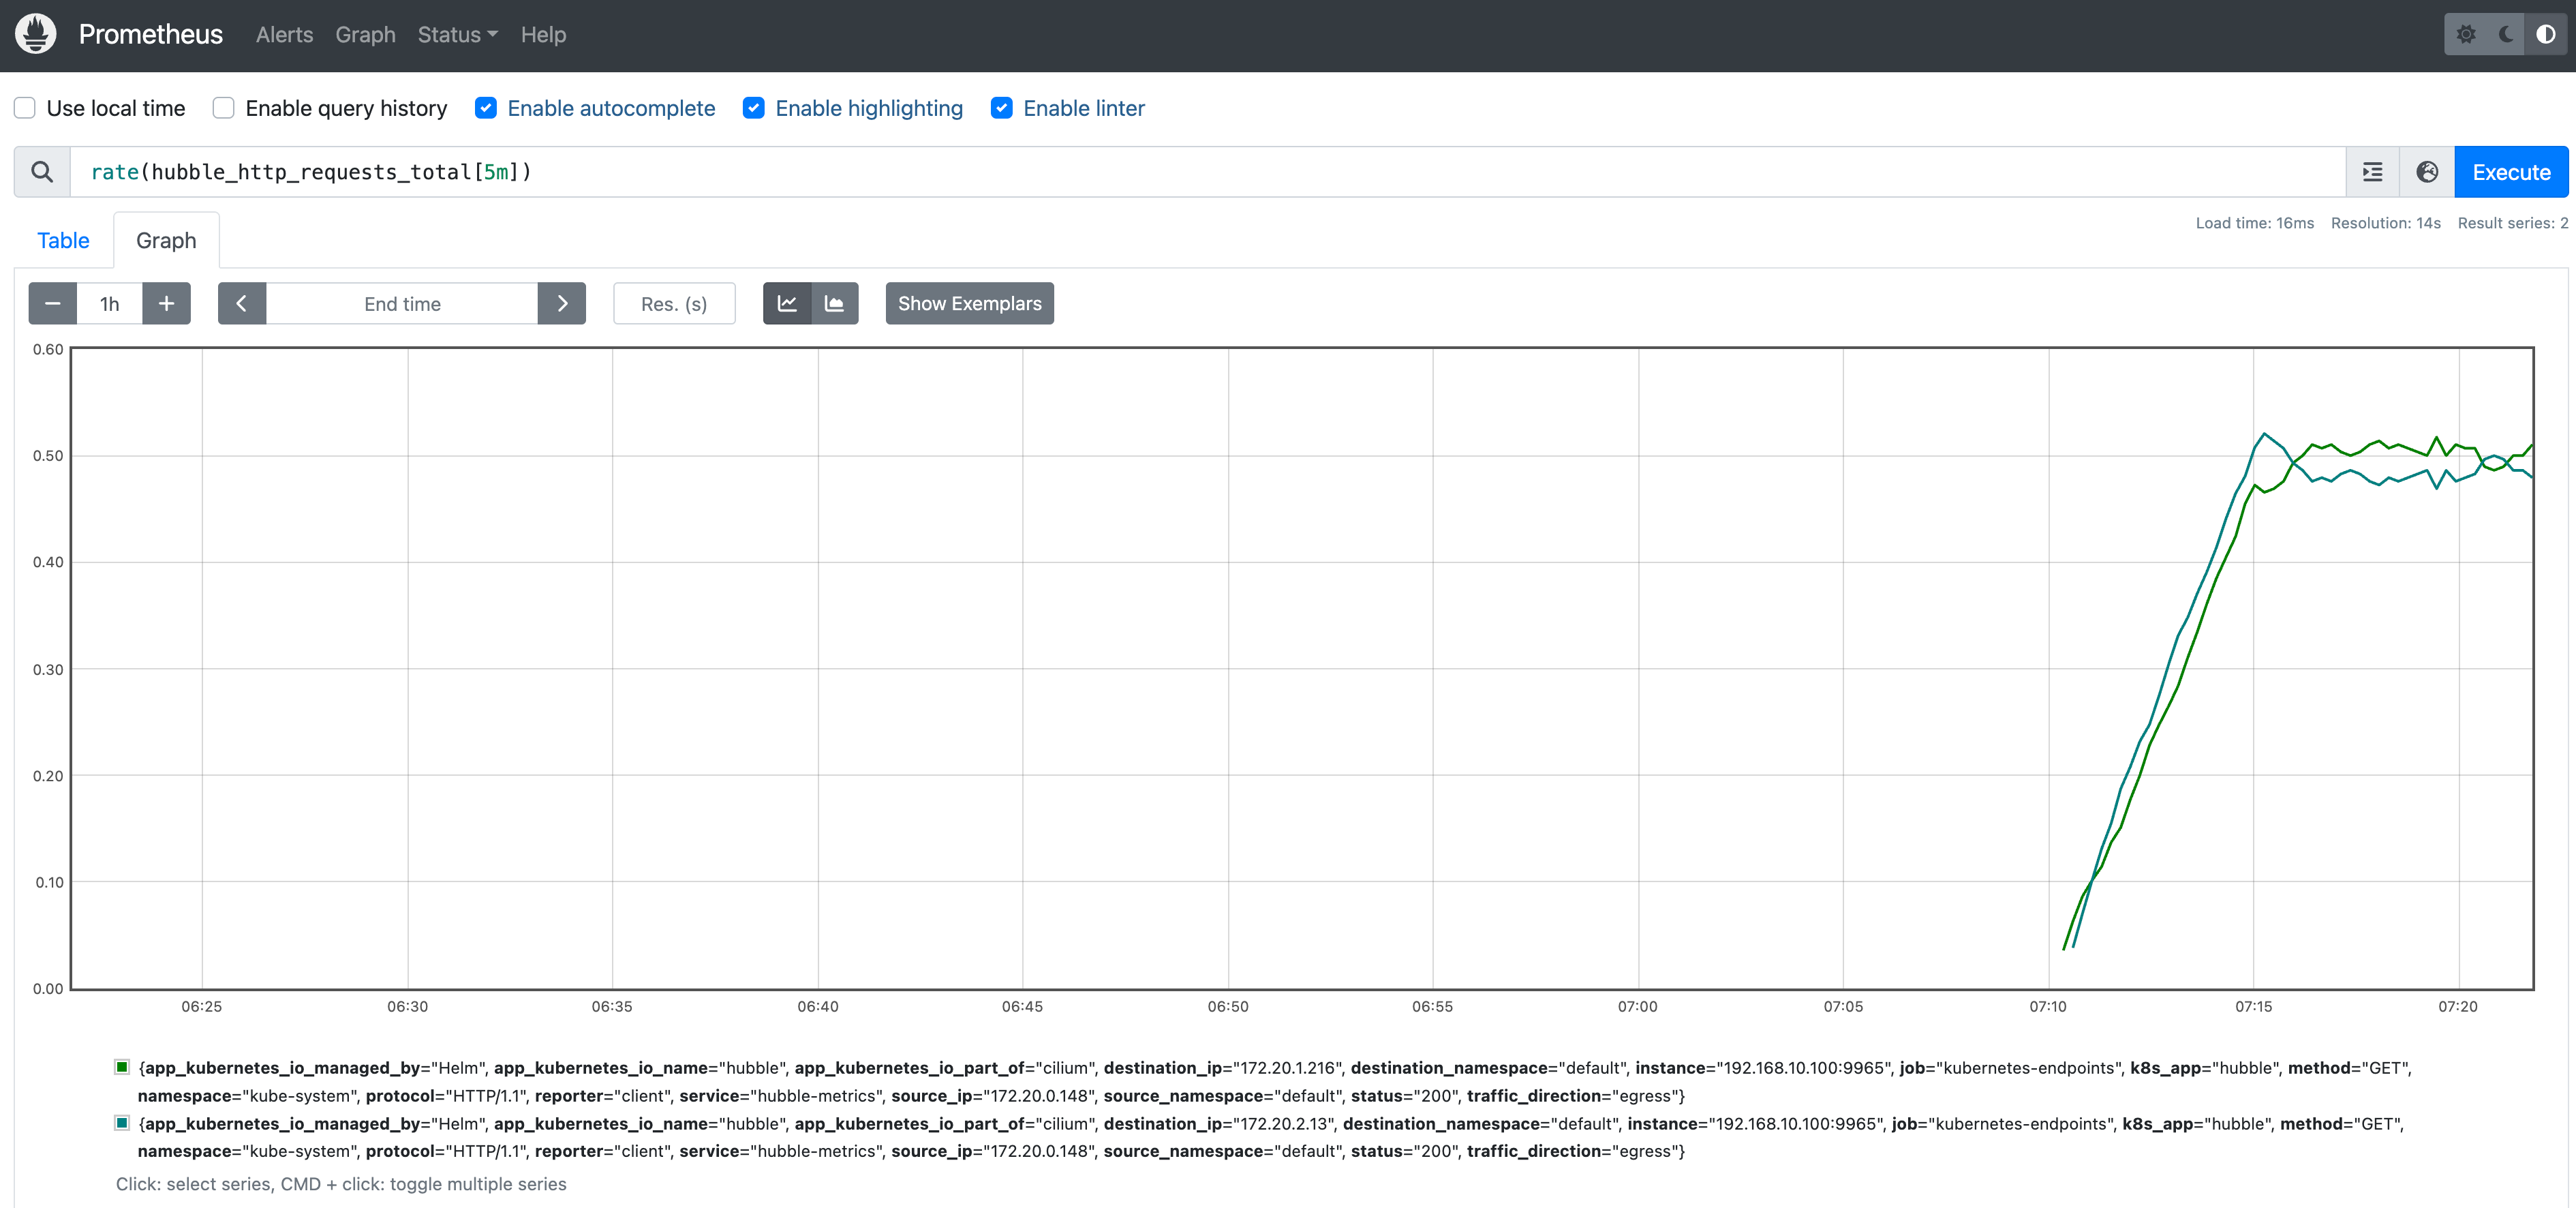
프로메테우스 rate(hubble_http_requests_total[5m]) 확인
민감정보 출력상태
민감정보(user_id)를 포함한 curl요청 시도한다.
kubectl exec -it curl-pod -- sh -c 'curl -s webpod/?user_id=1234'
user_id가 그대로 보이는 것을 확인할 수 있다.
hubble observe -f -t l7

보안을 강화하기 위해 Cilium은 Hubble이 L7 흐름에 존재하는 민감한 정보를 마스킹 할 수 있도록 --hubble-redact-enabled옵션을 제공한다. 민감정보 미출력 설정을 시도해보자.
1
2
helm upgrade cilium cilium/cilium --namespace kube-system --reuse-values \
  --set extraArgs="{--hubble-redact-enabled,--hubble-redact-http-urlquery}"
이제는 user_id가 보이지않는다

-hubble-redact-kafka-apikey : Kafka 프로토콜 통신에서 사용되는 민감한 API 키 정보를 관찰 데이터에서 제거
HTTP 헤더는 두 가지 방식 중 하나를 선택하여 민감한 정보를 제거
- 허용목록 방식 :
-hubble-redact-kafka-apikey - 거부목록 방식 :
-hubble-redact-http-headers-deny