[Cilium Study 1기 by Gasida] Cilium 환경 구축 및 실습
[Cilium Study 1기 by Gasida] Cilium 환경 구축 및 실습
- 실습환경 배포파일
Vagrantfile: 가상머신 정의, 부팅 시 초기 프로비저닝 설정init_cfg.sh: args 참고하여 설치kus-ctr.sh: kubeadm init (Pod/ServiceCIDR), 편리성 설정(k, kc)k8s-w.sh: kubeadm join
1
2
3
4
5
mkdir cilium-lab && cd cilium-lab

curl -O https://raw.githubusercontent.com/gasida/vagrant-lab/refs/heads/main/cilium-study/1w/Vagrantfile

vagrant up
- 배포후
vagrant ssh k8s-ctr,vagrant ssh k8s-w1,vagrant ssh k8s-w2접속
기본정보 확인
1
2
# ssh 접속 전, 노드들의 eth0 IP 확인
for i in ctr w1 w2 ; do echo ">> node : k8s-$i <<"; vagrant ssh k8s-$i -c 'ip -c -4 addr show dev eth0'; echo; done #
control plane(k8s-ctr 정보확인)
1
2
3
4
5
6
7
8
9
10
kubectl cluster-info
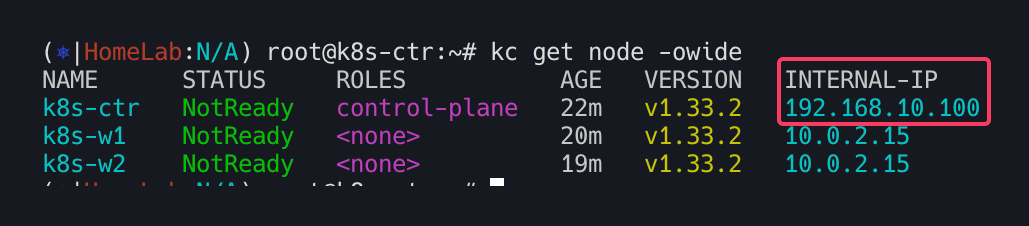
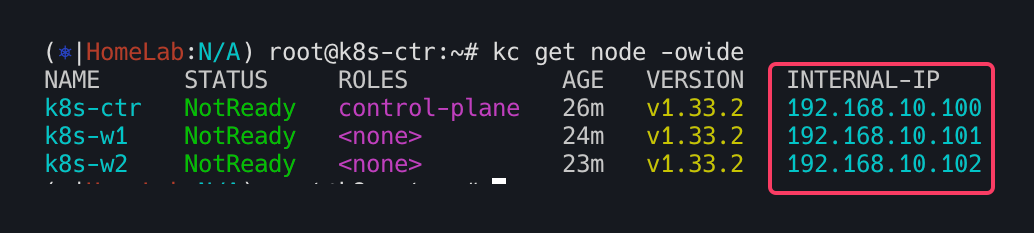
# 노드 정보 : 상태, INTERNAL-IP 확인
kubectl get node -owide
# 파드 정보 : 상태, 파드 IP 확인 - kube-proxy 확인
kubectl get pod -A -owide
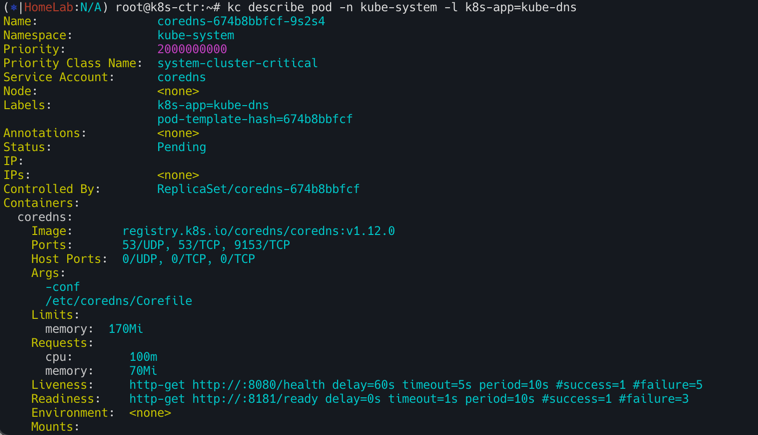
# 단축어 확인(kc = kubecolor) & coredns 파드 상태 확인
k describe pod -n kube-system -l k8s-app=kube-dns
kc describe pod -n kube-system -l k8s-app=kube-dns


INTERNAL-IP 변경 설정
1
2
3
4
5
6
7
8
cat /var/lib/kubelet/kubeadm-flags.env

# INTERNAL-IP 변경 설정
NODEIP=$(ip -4 addr show eth1 | grep -oP '(?<=inet\s)\d+(\.\d+){3}')
sed -i "s/^\(KUBELET_KUBEADM_ARGS=\"\)/\1--node-ip=${NODEIP} /" /var/lib/kubelet/kubeadm-flags.env
systemctl daemon-reexec && systemctl restart kubelet

cat /var/lib/kubelet/kubeadm-flags.env

워커노드 INTERNAL-IP 변경설정(k8s-w1,w2)


각 노드 INTERNAL-IP 확인

Control-plane의 static 파드의 IP 변경 설정
1
2
3
4
5
6
7
8
9
10
11
12
13
14
15
16
17
18
19
20
21
22
23
24
25
26
27
28
tree /etc/kubernetes/manifests
/etc/kubernetes/manifests
├── etcd.yaml
├── kube-apiserver.yaml
├── kube-controller-manager.yaml
└── kube-scheduler.yaml

# etcd 정보 확인
cat /etc/kubernetes/manifests/etcd.yaml
...
  volumes:
  - hostPath:
      path: /etc/kubernetes/pki/etcd
      type: DirectoryOrCreate
    name: etcd-certs
  - hostPath:
      path: /var/lib/etcd
      type: DirectoryOrCreate
    name: etcd-data

tree /var/lib/etcd/
/var/lib/etcd/
└── member
    ├── snap
    │   └── db
    └── wal
        ├── 0000000000000000-0000000000000000.wal
        └── 0.tmp
최종적으로 아이피 변경 유무 확인

Flannel CNI 설치 확인
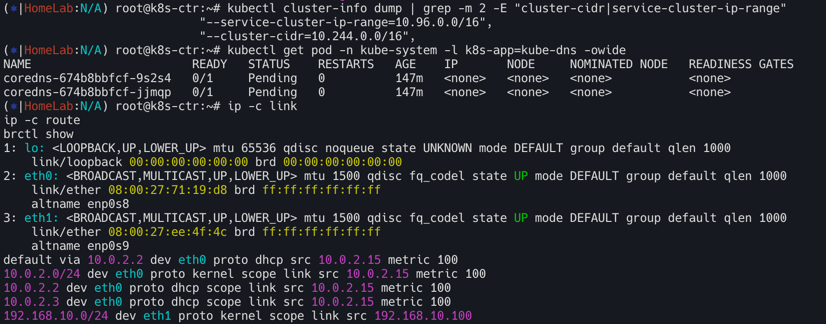
설치 전 확인
1
2
3
4
5
6
7
8
9
10
11
12
13
14
15
16
17
18
19
20
21
22
kubectl cluster-info dump | grep -m 2 -E "cluster-cidr|service-cluster-ip-range"
"--service-cluster-ip-range=10.96.0.0/16",
"--cluster-cidr=10.244.0.0/16",
kubectl get pod -n kube-system -l k8s-app=kube-dns -owide
#
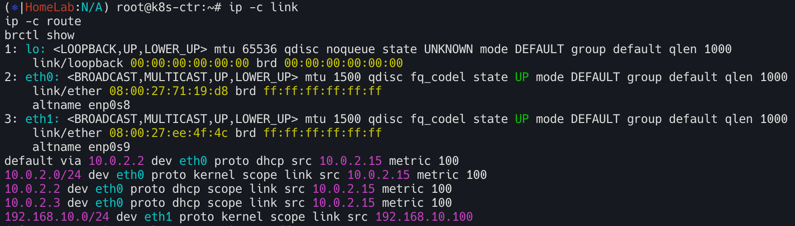
ip -c link
ip -c route
brctl show
ip -c addr
ifconfig | grep -iEA1 'eth[0-9]:'
#
iptables-save
iptables -t nat -S
iptables -t filter -S
iptables -t mangle -S
#
tree /etc/cni/net.d/


flannel CNI 설치
1
2
3
4
5
6
7
8
9
10
11
12
13
14
15
16
17
18
19
20
21
22
23
24
25
26
27
28
29
30
31
32
33
34
35
36
37
38
39
40
41
42
43
44
45
46
47
48
49
50
51
52
53
54
55
56
57
58
59
60
61
62
# Needs manual creation of namespace to avoid helm error
kubectl create ns kube-flannel
kubectl label --overwrite ns kube-flannel pod-security.kubernetes.io/enforce=privileged
helm repo add flannel https://flannel-io.github.io/flannel/
helm repo list
helm search repo flannel
helm show values flannel/flannel
# k8s 관련 트래픽 통신 동작하는 nic 지정
cat << EOF > flannel-values.yaml
podCidr: "10.244.0.0/16"
flannel:
args:
- "--ip-masq"
- "--kube-subnet-mgr"
- "--iface=eth1"
EOF
# helm 설치
helm install flannel --namespace kube-flannel flannel/flannel -f flannel-values.yaml
helm list -A
# 확인 : install-cni-plugin, install-cni
kc describe pod -n kube-flannel -l app=flannel
tree /opt/cni/bin/ # flannel
tree /etc/cni/net.d/
cat /etc/cni/net.d/10-flannel.conflist | jq
kc describe cm -n kube-flannel kube-flannel-cfg
...
net-conf.json:
----
{
"Network": "10.244.0.0/16",
"EnableNFTables": false,
"Backend": {
"Type": "vxlan"
}
}
# 설치 전과 비교해보자
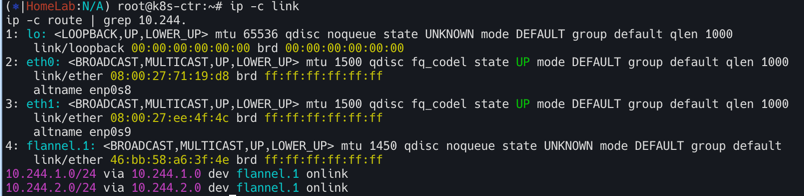
ip -c link
ip -c route | grep 10.244.
10.244.0.0/24 dev cni0 proto kernel scope link src 10.244.0.1
10.244.1.0/24 via 10.244.1.0 dev flannel.1 onlink
10.244.2.0/24 via 10.244.2.0 dev flannel.1 onlink
ping -c 1 10.244.1.0
ping -c 1 10.244.2.0
brctl show
iptables-save
iptables -t nat -S
iptables -t filter -S
# k8s-w1, k8s-w2 정보 확인
for i in w1 w2 ; do echo ">> node : k8s-$i <<"; sshpass -p 'vagrant' ssh -o StrictHostKeyChecking=no vagrant@k8s-$i ip -c link ; echo; done
for i in w1 w2 ; do echo ">> node : k8s-$i <<"; sshpass -p 'vagrant' ssh -o StrictHostKeyChecking=no vagrant@k8s-$i ip -c route ; echo; done
for i in w1 w2 ; do echo ">> node : k8s-$i <<"; sshpass -p 'vagrant' ssh -o StrictHostKeyChecking=no vagrant@k8s-$i brctl show ; echo; done
for i in w1 w2 ; do echo ">> node : k8s-$i <<"; sshpass -p 'vagrant' ssh -o StrictHostKeyChecking=no vagrant@k8s-$i sudo iptables -t nat -S ; echo; done
CNI 설치 전
CNI 설치 후
샘플 애플리케이션 배포 및 확인
1
2
3
4
5
6
7
8
9
10
11
12
13
14
15
16
17
18
19
20
21
22
23
24
25
26
27
28
29
30
31
32
33
34
35
36
37
38
39
40
41
42
43
44
45
46
47
48
49
50
51
52
53
54
55
56
57
58
59
60
61
62
63
64
65
66
67
68
# 샘플 애플리케이션 배포
cat << EOF | kubectl apply -f -
apiVersion: apps/v1
kind: Deployment
metadata:
  name: webpod
spec:
  replicas: 2
  selector:
    matchLabels:
      app: webpod
  template:
    metadata:
      labels:
        app: webpod
    spec:
      affinity:
        podAntiAffinity:
          requiredDuringSchedulingIgnoredDuringExecution:
          - labelSelector:
              matchExpressions:
              - key: app
                operator: In
                values:
                - sample-app
            topologyKey: "kubernetes.io/hostname"
      containers:
      - name: webpod
        image: traefik/whoami
        ports:
        - containerPort: 80
---
apiVersion: v1
kind: Service
metadata:
  name: webpod
  labels:
    app: webpod
spec:
  selector:
    app: webpod
  ports:
  - protocol: TCP
    port: 80
    targetPort: 80
  type: ClusterIP
EOF


# k8s-ctr 노드에 curl-pod 파드 배포
cat <<EOF | kubectl apply -f -
apiVersion: v1
kind: Pod
metadata:
  name: curl-pod
  labels:
    app: curl
spec:
  nodeName: k8s-ctr
  containers:
    - name: curl
      image: alpine/curl
      command: ["sleep", "36000"]
EOF

#
crictl ps
for i in w1 w2 ; do echo ">> node : k8s-$i <<"; sshpass -p 'vagrant' ssh vagrant@k8s-$i sudo crictl ps ; echo; done
확인
1
2
3
4
5
6
7
8
9
10
11
12
13
14
15
16
# 배포 확인
kubectl get deploy,svc,ep webpod -owide
kubectl api-resources | grep -i endpoint
kubectl get endpointslices -l app=webpod

# 배포 전과 비교해보자
ip -c link
brctl show
iptables-save
iptables -t nat -S

# k8s-w1, k8s-w2 정보 확인
for i in w1 w2 ; do echo ">> node : k8s-$i <<"; sshpass -p 'vagrant' ssh -o StrictHostKeyChecking=no vagrant@k8s-$i ip -c link ; echo; done
for i in w1 w2 ; do echo ">> node : k8s-$i <<"; sshpass -p 'vagrant' ssh -o StrictHostKeyChecking=no vagrant@k8s-$i ip -c route ; echo; done
for i in w1 w2 ; do echo ">> node : k8s-$i <<"; sshpass -p 'vagrant' ssh -o StrictHostKeyChecking=no vagrant@k8s-$i brctl show ; echo; done
for i in w1 w2 ; do echo ">> node : k8s-$i <<"; sshpass -p 'vagrant' ssh -o StrictHostKeyChecking=no vagrant@k8s-$i sudo iptables -t nat -S ; echo; done
통신 확인
1
2
3
4
5
6
7
8
9
10
11
12
13
14
15
kubectl get pod -l app=webpod -owide
kubectl exec -it curl-pod -- curl $POD1IP

kubectl get svc,ep webpod
kubectl exec -it curl-pod -- curl webpod
kubectl exec -it curl-pod -- curl webpod | grep Hostname
kubectl exec -it curl-pod -- sh -c 'while true; do curl -s webpod | grep Hostname; sleep 1; done'

# Service 동작 처리에 iptables 규칙 활용 확인 >> Service 가 100개 , 1000개 , 10000개 증가 되면???
kubectl get svc webpod -o jsonpath="{.spec.clusterIP}"
SVCIP=$(kubectl get svc webpod -o jsonpath="{.spec.clusterIP}")
iptables -t nat -S | grep $SVCIP
for i in w1 w2 ; do echo ">> node : k8s-$i <<"; sshpass -p 'vagrant' ssh -o StrictHostKeyChecking=no vagrant@k8s-$i sudo iptables -t nat -S | grep $SVCIP ; echo; done
-A KUBE-SERVICES -d 10.96.255.104/32 -p tcp -m comment --comment "default/webpod cluster IP" -m tcp --dport 80 -j KUBE-SVC-CNZCPOCNCNOROALA
-A KUBE-SVC-CNZCPOCNCNOROALA ! -s 10.244.0.0/16 -d 10.96.255.104/32 -p tcp -m comment --comment "default/webpod cluster IP" -m tcp --dport 80 -j KUBE-MARK-MASQ
이 기사는 저작권자의 CC BY 4.0 라이센스를 따릅니다.